Harumaki (Japanese Spring Rolls)
This post may contain affiliate links. See my disclosure policy.
My harumaki, AKA Japanese-style spring rolls, are stuffed with juicy meat and tender veggies and fried until golden brown. Each is delicate yet crispy and SO easy to make!

My partner and I always order harumaki (Japanese spring rolls) whenever we go to a Japanese restaurant, and we immediately judge them on two things: how juicy the filling is and how crispy the exterior is.
When developing a homemade version, I discovered the secret to both was surprisingly simple: don’t pre-cook the filling. Warm filling creates steam inside the wrapper, softening it from the inside and leading to soggy spring rolls.
The result is crispy, golden harumaki with a juicy, savory filling and plenty of crunch in every bite. While not the authentic Japanese recipe (I suggest checking out Just One Cookbook’s Harumaki for that!), it’s my simplified version.
Table of Contents
Arman’s tips before starting

- Keep the filling raw. This is my #1 tip and different from other recipes. Warm filling creates steam inside the wrapper, which can make spring rolls soggy once they’re fried.
- Don’t overfill the wrappers. I’ve tested this more times than I’d like to admit, and overstuffed rolls almost always split or burst while frying.
- Seal the wrappers well. If the edges aren’t sticking, mix a little flour with water to make a paste and brush it along the seams before rolling.
- Fry in batches. Adding too many spring rolls at once drops the oil temperature and prevents them from becoming evenly golden and crispy.

Ingredients needed
Here’s what goes into this harumaki recipe, along with my kitchen notes. Full measurements are in the recipe card below.
- Pork. I like using lean ground pork, as there’s enough moisture from the veggies and seasonings. Higher-fat cuts work, but I recommend draining the excess moisture.
- Soy sauce. Adds the savory, umami-rich flavor essential to the filling.
- Black pepper. Just a pinch helps balance the richness of the pork.
- Sugar. Don’t skip this. It rounds out the saltier ingredients and gives the filling better overall balance.
- Sake. My secret ingredient. It adds a subtle depth of flavor without making the filling taste boozy.
- Egg. Helps bind the filling together and keeps it juicy.
- Sesame oil. A little goes a long way, adding that unmistakable nutty flavor I associate with restaurant-style harumaki.
- Cabbage and green onions. My preferred vegetable combination. The cabbage adds texture while the green onions add freshness.
- Egg roll wrappers. Look for them in the refrigerated section of Asian grocery stores or larger supermarkets. I prefer the thinner wrappers because they fry up extra crispy.
- Oil. Use a neutral oil with a high-smoke point, such as vegetable, canola, or peanut oil.
Recipe variations
- Switch up the protein. I’ve made these with ground chicken, finely chopped shrimp, and even crumbled tofu, and they all work well.
- Add more vegetables. Add finely shredded carrots, peas, bean sprouts, or shiitake mushrooms.
- Turn up the heat. If you can handle the heat, add a dash of paprika, red chili flakes, or chili sauce to the pork mixture.
- Boost the aromatics. Try adding finely chopped ginger or cilantro.
How to make harumaki
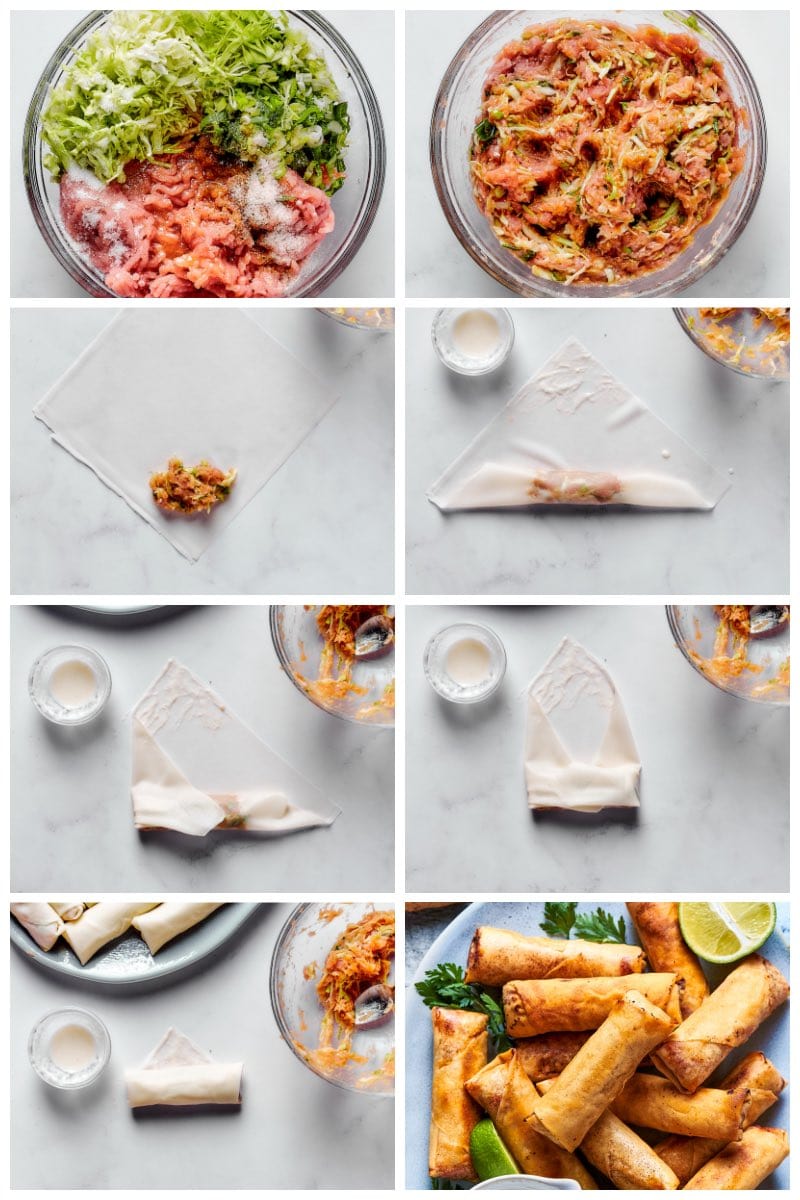
Step 1- Mix the filling. In a large bowl, combine all ingredients except the wrappers and frying oil.
Step 2- Prepare the wrappers. Read the egg roll wrapper instructions and prepare them accordingly.
Step 3- Stuff. Using lightly wet hands, scoop golf ball-sized portions of the pork mixture.
Step 4- Wrap. Place each portion onto a spring roll wrapper, fold it lengthways, and close it on either end. Repeat this process to make 25 egg rolls.
Step 5- Fry. Add oil to a large frying pan. Once hot, fry the spring rolls until they are golden and crispy on both sides.
Storage instructions
To store: Place leftover Harumaki in a sealable container and refrigerate for up to 3 days.
To freeze: Place the cooked and cooled spring rolls in a Ziploc bag and store them in the freezer for up to two months. Thaw it overnight.
Reheating: For the crispiest results, reheat the spring rolls in a 400°F oven, air fryer, or hot skillet until heated through and crisp again. I avoid the microwave, as it softens the wrappers.
Make-ahead tip
You can prepare the uncooked spring rolls in advance and cook them later.
Once you’ve prepared the rolls, gently place them in a shallow container, adding parchment paper between each layer to prevent sticking. Store them in the freezer for up to two months.
When ready to cook, let them thaw to room temperature.

Frequently asked questions
Yes. Brush or spray the spring rolls lightly with oil, then air fry at 400°F for 8-10 minutes, flipping halfway through, until golden brown and crispy. The wrappers won’t be quite as blistered as deep-fried harumaki, but they’ll still be delicious.
More Japanese appetizers
- Japanese potato salad
- Chicken katsu
- Mochi donuts
- Beef negimaki
- Kani salad
- Tuna tartare
- Chicken yakitori

Harumaki (Japanese Spring Rolls)
Ingredients
- 10 ounces ground pork
- 2 tablespoons soy sauce
- 1/2 teaspoon pepper
- 1 teaspoon sugar
- 1 tablespoon sake or 1 teaspoon vinegar
- 1 large egg whisked
- 2 teaspoons sesame oil
- 10 ounces cabbage finely chopped
- 4 large green onions thinly sliced
- 25 egg roll wrappers
- 1/4 cup oil to fry
Instructions
- Mix the pork, soy sauce, pepper, sugar, sake, egg, sesame oil, cabbage and green onions in a bowl.
- Read the egg roll wrapper instructions and prepare them accordingly. If they require soaking, do so.
- Using lightly wet hands, scoop out golf ball-sized portions of the pork mixture. Place each portion onto an egg roll wrapper, fold it lengthways, and close it up on either end- the filling should stay compact but not so tightly that the wrapper tears. Repeat this process until you have 25 egg rolls.
- Add oil to a non-stick pan. Once hot, fry the spring rolls until golden and crispy on both sides, about 4-5 minutes.
- Place the cooked harumaki on a paper towel to soak up excess oil. Serve immediately.
Notes
Nutrition
Originally published July 2022


Thank you Thank you Thank you! I am going to try all of these recipes. My son just came out of the hospital after 5 days with severe Diabetes and heart problems. We have to change how and what we cook now. Mostly the keto recipes and those for carbs and sodium content. I am looking at all of your recipes.
Great sounding and I am sure will absolutely work for us! I’ll let you know abut how much I am sure, from looking at the ingredients recipes and your expertise, we will love all of them.
I cannot tell you how great this is for us!
Many Blessings to you!
Adrienne ♥
Hi Adrienne, I hope your son is doing well and you’re very welcome! I hope you’ve found some delicious things to try that will fit into his new diet.
I always was buying spring rolls frozen from Lidl. Now I finally have the recipe to make them homemade!
What can replace the sake in the recipe ?
a touch of vinegar is fine
These are wonderful! I air-fried mine, OMG, they come out nice & crispy without all that oil (just spritz them with EVOO before placing in the basket). THANKS for another great recipe – you & your site are AWESOME! I’ve already turned 2 vegetarians/vegans onto this blog. I’ll make that yummy 3-ingredient coconut ice cream soon!
Aw I love that!!! So glad to hear the air fryer option worked well for you 🙂
Is there a recipe to make diy keto friendly egg roll wraps?
Not that I’ve come across!